

Action
Activity 2: Creating Your Sound Bank
Activity 3: Assigning Variables to Your Sound Clips
Activity 4: Adding Sound Clips to your Tracks
Activity 5: Recording & Adding a Sound to EarSketch
Action: Creating A Soundbank And Variables
Activity 2: Creating Your Soundbank (15 minutes)
Now that you have the outline of your script, let’s add some music. EarSketch has audio stems (sound clips) from genres such as R&B, Hip Hop, EDM, House, Pop, and Funk (and many more), and from over 300 different instrument samples. We are proud to present sound clips from our participating Indigenous Canadian musicians—Samian, Jayli Wolf, and Dakota Bear. In addition to these, we have sound clips from recording artists and sound engineers such as Pharrell, Ciara, Common, Richard Devine, and Young Guru. (Select the artist's name to learn more about their music.)
You will create a #SOUNDBANK with all our favourite sounds that we will use during our song. For more details on #SOUNDBANK , see the EarSketch curriculum (25.6)
Related Video tutorials:
Create a new script with a #SOUNDBANK. Your sound bank will be like a drawer that holds your selected sound clips. You will go into that drawer and place those sounds in your song when and where you want them.
- Create a new script called Your Voice is Power [Your Initials].
- Don't include the brackets [ ] in the script name!
- Type #SOUNDBANK in the CODE EDITOR on an empty line after the setTempo(120) line.
- Do you remember what the # does? We saw that in Module 2. The # makes it a comment so it won’t be executed as a line of code.
Your finished code should look similar to the following:
# description:
from earsketch import *
setTempo(120)
# SOUNDBANK
Listen to and choose some great beats.
- Access the sound browser by selecting SOUNDS (headphones icon) in the CONTENT MANAGER.
- Search for sounds by artist, genre, and instrument. You can reset your search at any time using the Clear filters button in the bottom left corner.
- If you have no filters applied, the sound manager will list recommendations for sounds that fit your script or sounds used by others who have searched for similar sounds.
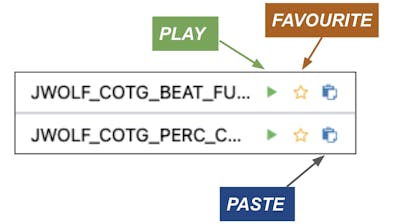
- Use the green play button next to the sound clip’s name to listen to it and decide if you like it.
- Use the blue clipboard icon to paste the sound clip into your code editor under the #SOUNDBANK heading. TIP: It will paste the sound clip to wherever the cursor was last located in the CODE EDITOR.
- Add two sound clips to your #SOUNDBANK – one drum sound and one vocal sound.


TIP: You might add separate sections to your #SOUNDBANK for each category of sound clip. For example:
#drums
#vocals
#strings
etc.
Your finished code should look similar to the following:
# description:
from earsketch import *
setTempo(120)
# SOUNDBANK
#drums
SAMIAN_PEUP_BEAT_FULL
#vocals
TFLAMES_OC_VOX_BKUP_CHOR_1
Activity 3: Assigning Variables to Your Sound Clips (15 minutes)
Related Video tutorials:
Some of the sounds have pretty long names. E.g., JWOLF_COTG_BEAT_FULL
We can use variables to give our sounds nicknames.
E.g. drum=JWOLF_COTG_BEAT_FULL
Now when you want JWOLF_COTG_BEAT_FULL, you can use its nickname or variable - drum.
A variable is like a container that stores data or information. You give this container a name to remind you what information you put inside it. You can put whatever kind of data you like inside! The information can be numbers, words, and sentences called strings, or unchangeable data called constants, like our sound clip names.
Assign the clips from your #SOUNDBANK to variables
- Create a variable with a name that will help you remember the sound it will store and use the assignment operator ‘=’ to assign your variable a value.
- E.g. drum=JWOLF_COTG_BEAT_FULL
- Assign each sound clip in your #SOUNDBANK to a variable to give it a nickname you can use in your code.
- Add 3 more sound clips to your #SOUNDBANK!
- Think about the different instruments you heard in Samian's song. What different instruments could you add to your song?
- Assign each of your new sound clips to a variable.
TIP: Most songs include at least one sound from the following categories:
- SteadyBeat - drum beats and percussion loops
- Bass - Deep and low sounding instruments
- Harmony - “steady” toned instruments without much action, like strings
- Melody - the main tune of the song, often able to be sung.
- Sound Effects(SFX) - fun accents or “bells and whistles” that occasionally happen in a song for emphasis.
Learn more about variables in this tutorial with video.
Your finished code should look similar to the following:
# description:
from earsketch import *
setTempo(120)
# SOUNDBANK
#drums
drums = SAMIAN_PEUP_BEAT_FULL
#bass
bass = TFLAMES_OC_BASS_CHOR
#flute
flute = SAMIAN_PEUP_THEME_FLUTE
#strings
strings = SAMIAN_PEUP_THEME_STRINGS_3
#vocals
vocal1 = TFLAMES_OC_VOX_BKUP_CHOR_1
Activity 4: Adding Sound Clips to your Tracks (15 minutes)
Now we will revisit fitMedia(). This time, you are going to be in charge of 'fitting the media' in where you want! We have our sounds and even assigned them cool nicknames (or variables). Now, you are ready to remix them in your song using the function fitMedia(). Remember, a function is a piece of code that performs a task. The fitMedia() function adds an audio file to a specified track at specific start and end times.

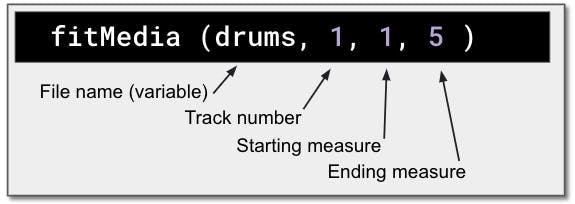
The fitMedia() function takes in four input parameters:
- sound: The sound clip to place in the Digital Audio Workstation
- track Track on which music is placed
- start: The measure at which the sound clip will start
- end: The measure at which the sound clip will end
E.g. fitMedia(drums,1,1,5)
A function is a piece of code that performs a task—often consisting of many smaller actions.
Related Video tutorials:
Use the function fitMedia() to add the new sounds as an introduction to your song.
- Type #intro to your script in the code editor after all the sounds you added to your #SOUNDBANK.
- #intro is a comment to help organize the structure of your song. Of course, this is all practice so you can learn the skills. You can change the sounds later. It may not end up being the intro of your final song!
- Select enter to type on the line below #intro
- On the next line, after #intro, type fitMedia()
Notice that the code editor tries to help you by automatically filling in some of the parentheses. You can accept these autosuggestions or type the command yourself. - Specify the values listed below as parameters for fitMedia(). Don't forget to include a comma "," between the parameters. The final result should look similar to the following but with your variable name instead of ‘drums’
fitMedia(drums,1,15)
- sound: Choose a sound from your #SOUNDBANK and type the variable name (The sound clip to place in the Digital Audio Workstation)
- track: 1 (Track on which music is placed)
- start: 1 (The measure at which the sound clip will start)
- end: 5 (The measure at which the sound clip will end)
Your finished code should look similar to the following:
# description:
from earsketch import *
setTempo(120)
# SOUNDBANK
#drums
drums = SAMIAN_PEUP_BEAT_FULL
#bass
bass = TFLAMES_OC_BASS_CHOR
#flute
flute = SAMIAN_PEUP_THEME_FLUTE
#strings
strings = SAMIAN_PEUP_THEME_STRINGS_3
#vocals
vocal1 = TFLAMES_OC_VOX_BKUP_CHOR_1
#intro
fitMedia(drums, 1,1,5)
- Select Run and Play.
You have coded your first piece of music. How does it sound?
Repeat this process for the remaining four sound clips. But specify a different track (2, 3, 4, etc.) for each sound. Make sure the end is a number bigger than start.
- For now start all your sounds on measure 1 and end them on measure 5.
- If you want to add sound clips directly from the sound browser, you can select the blue clipboard icon to paste the sound name directly into the fitMedia() function.
- When you play the song , all the sounds play at the same time which may sound great or may sound terrible. You can experiment with different sounds or which sounds you choose to play to see what sounds good together. We will learn how to start and stop sounds at different parts of the song in Module 6.
Your finished code will look similar to the following:
# description:
from earsketch import *
setTempo(120)
# SOUNDBANK
#drums
drums = SAMIAN_PEUP_BEAT_FULL
#bass
bass = TFLAMES_OC_BASS_CHOR
#flute
flute = SAMIAN_PEUP_THEME_FLUTE
#strings
strings = SAMIAN_PEUP_THEME_STRINGS_3
#vocals
vocal1 = JWOLF_COTG_VOX_MISC_SHOUT
#intro
fitMedia(drums, 1,1,5)
fitMedia(bass,2,1,5)
fitMedia(flute,3,1,5)
fitMedia(strings,4,1,5)
fitMedia(vocal1,5,1,5)
Remember to check that you have commas between each argument and close your parentheses. Run and play your song often to hear your beats. If you need additional support, check out the EarSketch chapter on Composing in EarSketch.
Congratulations, you are officially a code DJ!
OPTIONAL BONUS CHALLENGE: Kick it up a notch!
This is a tricky one, so if you are new to coding, you may want to come back to it later when you have mastered fitMedia().
setEffect() is a function that allows you to add effects to sounds on different tracks to add echos, delays, change pitch, and change volume.
For example, as you work on your song, you might notice that the keyboards are too loud and you can’t hear the vocals. You can use setEffect() to increase or decrease the volume of all the sounds on a particular track.
setEffect(track, type, parameter, value)
- track - The number of the track on which to apply the effect
- type - Which effect you want to do e.g. VOLUME (to change volume) PITCHSHIFT (to change pitch)
- parameter - What part of the effect are you changing, e.g. GAIN to change volume level, PITCHSHIFT_SHIFT to specify how much to adjust pitch
- value - The value for the parameter. For exmaple GAIN can range from -60.0 to 12.0, PITCHSHIFT_SHIFT can range from -12.0 to 12.0
Examples:
#increase volume on track 2
setEffect(2,VOLUME, GAIN, 8)
#decrease volume on track 3
setEffect(3, VOLUME, GAIN, -30)
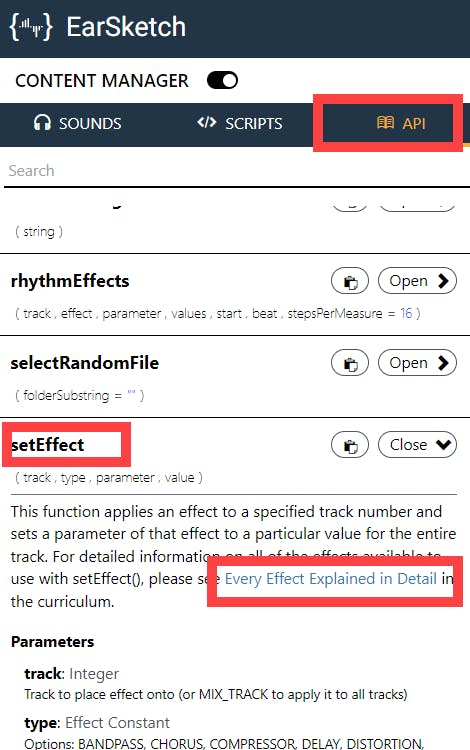
This is NOT a comprehensive explanation. To learn more, go to CONTENT MANAGER | API and look up setEffect().
In the API documentation there is a link to Every Effect Explained in Detail. These two resources will help you figure out how to use effects. Coders rely heavily on API (Application Programming interface) documentation to figure out how to do new things. An API is a function someone else created that has an interface which allows other programmers to use it.

There are more functions you can explore listed in Extension B
Activity 5: Recording and Adding a Sound to EarSketch (10 minutes + homework)
You may want to add your own sounds to the sound browser so you can include them in your song. You can say or sing your own lyrics, upload something you’ve recorded, or upload clips from another copyright-free source.
Record your own sound:
- Open your Your Voice is Power [Your Initials] script.
- Select the +Add Sound button in the Sound browser.

3. Select the QUICK RECORD tab

.png?ixlib=gatsbyFP&auto=compress%2Cformat&fit=max&w=727&h=368)
Countoff Measures determines how many measures will count down after you select REC before recording begins.
Measures to Record determines how many measures are recorded. You can record a maximum of 8 measures at a time. With a tempo of 120 BPM, one measure is 2 seconds long. So you can record a 16 second clip.
- When you are ready to record, select the REC icon to start the countdown, the icon will display a Get Ready message during the countdown, and will display the number 1 when it is recording. The number displayed counts the number of measures into the recording. Increase the number of measures recorded by changing Measures to record.
- Preview your recorded sound using the Play button. If you want to re-record. Select Clear.
- Once you are satisfied with your recording, type a name for your recording in the field Constant Name and select UPLOAD.

.png?ixlib=gatsbyFP&auto=compress%2Cformat&fit=max&w=724&h=555)
Add your recorded sound to your song
- Go to the sound browser. If you have any filters applied select Clear Filters
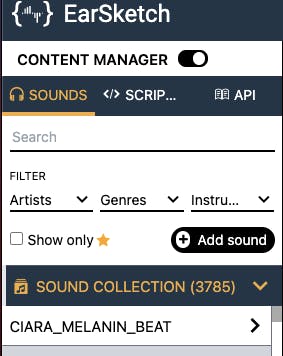
- List sounds by ARTISTS. Your username will be listed as an artist.

.png?ixlib=gatsbyFP&auto=compress%2Cformat&fit=max&w=476&h=852)
- Select your username from the list of artists. Your sound clip will be listed in the search results.
- Add your sound clip to the #SOUNDBANK
- Assign the sound clip to a variable.
- Replace one of the tracks you have in your #intro with your new sound by changing the variable name in one of the fitMedia()functions.
- Select Run and Play to listen to your song with the sound you added.

.png?ixlib=gatsbyFP&auto=compress%2Cformat&fit=max&w=478&h=250)
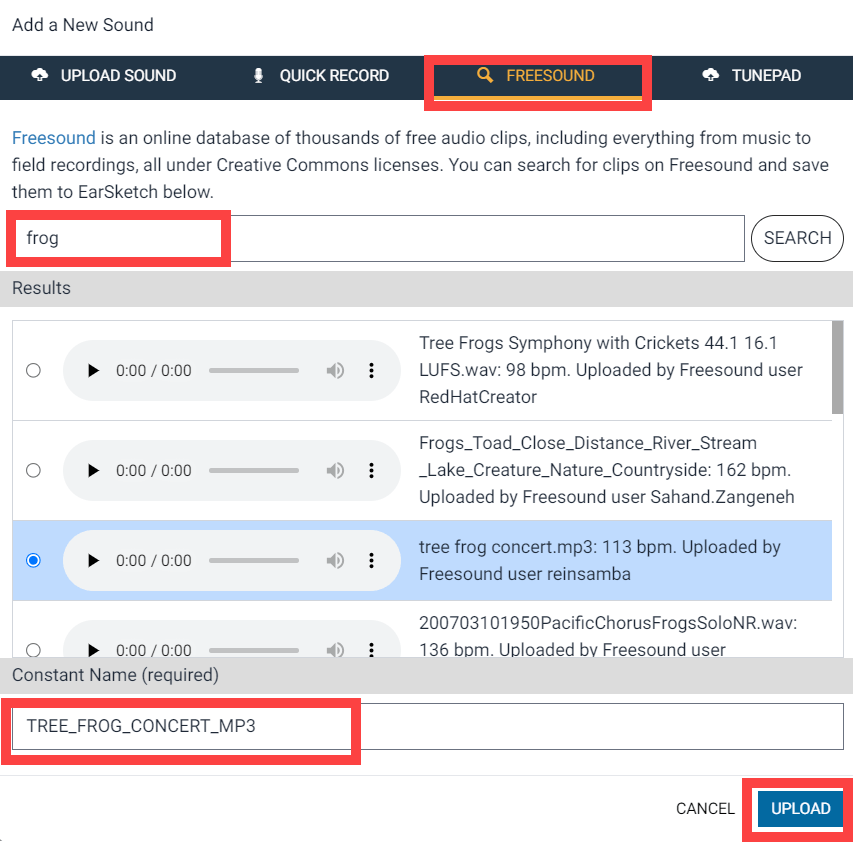
OPTIONAL BONUS CHALLENGE: Add one of the copyright free sounds in FREESOUND.
When you select +Add Sound, one of the tabs listed is FREESOUND. FREESOUND gives you the ability to search and add sounds from an online database of thousands of free audio clips you can use in your songs because they are available under the creative commons license. We have not provided detailed instructions, but the screenshot below should help. Sometimes optional features are not well documented and programmers have to experiment to figure out how it works. Can you figure it out?
TIP: After you upload the sound, you can locate it by searching for GENRES | FREESOUND

Extension A shows students how to add sound clips they like to favourites.